As some of you might have discovered when creating your Chronologies, the first website (and thus the birth of the world wide web) went live in 1991 lead by the WWW team at CERN.
CERN, recognizing the importance of preserving the first website, has initiated a project to restore "the world's first website."
So far the earliest copy of the site that team members have been able to find dates back to 1992, and as of yesterday it has gone live at the original URL: http://info.cern.ch/hypertext/WWW/TheProject.html
Take a minute to look at a piece of history that has had a major impact on the past 20 years of LIS technology.
I recently saw a situation similar to this at librarianproblems.com, but this recently happened to me at our reference desk.
Little Sparrow: I need you to make a copy of this for me. *Man pulls out a black & white copy of a driver's license*
Me: No problem, that will just be $.15 for a black & white copy.
Little Sparrow: I actually need a color copy.
Me: No problem, I just need your original license.
Little Sparrow: You mean you can't turn this *holds up black & white copy* into color?
Me: I'm sorry, it doesn't work like that. If you can come back with the original I will be more than happy to help you out.
***
Hope everyone has enjoyed this blog and has a great summer! (unless you are taking Genealogy for Maymester, in which case I'll see you there!)
In Part 1 I discussed uses for panoramic and time-lapse photography in libraries. For Part 2 I will take you through the Basic steps of how to create your own.
To create a video like the one I produced for my library you will need:
DSLR Camera
While you can use a point and shoot to create time-lapses and panoramic photos, it often requires that you modify the firmware of your camera with third party software (especially with time lapse photography).
Another added benefit is that DSLR cameras can shoot in the uncompressed RAW format which allows for easier editing if you had some of your initial settings wrong.
A wide-angle lens
Use a wide angle for panoramas especially. A standard lens (35mm and up) could be used, but would require more photos to be taken. For the videos and images above I used a Canon 20mm and a Tokina 11-16mm lens.
For time-lapses use whatever lens fits your needs, however in the videos above I used a wide-angle lens.
Tripod
Preferably a tripod with a panning head and 360 degree markings.
An Intervalometer or camera with modified firmware such as Magic Lantern with built-in intervalometer.
An intervalometer is a device that you connect to your camera that can take a set number of photographs over a set period of time, as well as holding the camera's shutter open for a desired period of time (this is good for shooting night time photography).
A Computer
I use Macs for editing preferably.
Adobe Lightroom
For managing and editing the photographs and for exporting the final time-lapse video.
Open Source panorama stitcher for OS X, Linux, and Windows.
Presentation/Slideshow software with the ability to pan large images such as FotoMagico for Mac.
Optional but helpful: Extra batteries and memory cards.
Time and Patience.
Creating Panoramic
Images
Creating panoramic images is a really simple process. Modern Android and iPhone smartphones have the ability to create panoramic shots with their built in camera software. While you can take shots by hand, using a tripod helps to eliminate shake and allows for you to eliminate a lot of overlap (which can cause artifacts in your final image).
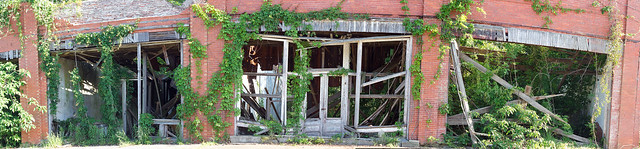
By using panoramic stitching software such as Hugin you will be able to take individual shots such as the ones directly below and turn them in to one final shot (to she the original images go here).
Find something that you want to take a panoramic image of and mentally frame the shot.
Set up your camera, frame the shot, adjust your settings, and take a test shot. Repeat as necessary.
When you are ready to take your first real shot be sure to take it at the extreme edge of the final image you wish to create (you will either be panning your camera left to right or right to left).
Take the shot.
Pan your tripod head left or right (depending upon where you started from) in incremental degrees based upon your distance from your subject and the lens you are using.
For the above shot I was using a 50mm lens at a distance of 30 feet from my subject, so I moved my tripod in 20 degree increments. If I was using a 20mm lens at the same distance I would have moved the tripod in smaller increments because more of the building would have been in view originally.
Take your next shot and repeat step 4 as necessary until satisfied.
For the image above I stitched together 5 images (you can stitch together as few as two images).
Upload your images to your computer.
Import your images into your photo managing software of choice (in my
case Adobe Lightroom) and edit your first shot.
It is important to make sure that each shot has the same White Balance and Exposure. You can either do this by taking your photos in manual or by taking your photos in the uncompressed RAW format (not a compressed jpg).
Copy the settings of your first shot and paste them into your other images to make sure that they all have the same settings.
If you shot in Raw export your images to jpg or tif once you are finished editing.
Open Hugin and load your images.
Select align.
Once the alignment is finished you will have the option to change the alignment and orientation of the image as well as crop the image to your desired setting.
Once finished with step 12 select "Create panorama," name the file, and select save.
The last step is to open your finished tif file to check for errors, and if satisfied convert your image to whatever format you wish to use (jpg, gif, etc.).
There are a number of tutorials on Hugin's site that will give you a more in depth walk through, as well as video tutorials on YouTube such as this:
Creating Time-Lapse Videos
For the most part you approach creating time-lapses the same
way that you approach creating panoramic images, but instead of stitching/blending
the images together you are presenting them sequentially in a video format. Depending
on the settings and the rate of images taken there are similarities to “stop
motion” videos.
Here is a time-lapse example I created last night using the
following steps:
Steps
Locate something that you want to take a
time-lapse of (library computer lab, reference desk, front entrance, etc.).
Set up your camera and tripod and adjust your
cameras settings. Set your focus, white balance, and exposure to manual to
insure all settings match.
Set your intervalometer to your desired
settings.
Set it to take a shot every x-amount of
seconds/minutes/hours.
Set the desired amount of shots to take (my
intervalometer can take up to 9999 shots for instance)
When you are ready to begin take a test shot to
check your settings. If the shot meets your needs start your intervalometer.
If your camera does not need to be attended and
your shooting is going to be over several hours be sure to check back
occasionally to monitor your battery and memory card.
When you are finished import your images
into your photo manager. The rest of the steps are Lightroom and
LRTimeLapse specific.
Open up LRTimeLapse
Locate the image folder that you
imported your images to.
Select Initialize
Once the previews have loaded (this can
take quite a while) define the area of brightness in your first image (be sure
to select something constant, in the video above I selected the blender in the
background).
Preview the time-lapse
Select your keyframes and save.
Open up Lightroom and select the images
you previously imported
Select grid view and select all of your
images
Select the Metadata menu option and
click on “Read metadata from files.”
Find the first image in your sequence
with a star (this is your keyframe) and edit the image according to your taste.
By default LRTimeLapse changes the white balance and crops the image. You can
change the crop and white balance to your tastes.
Copy the images settings and select your
other images. Paste the first images settings into your other images.
Save the metadata and switch back to
LRTimeLapse
In LRTimeLapse select reload.
Click on Auto transition.
If there is a lot of “flicker” in your
preview video select “deflicker” and adjust the settings as necessary.
Click on Save and return to Lightroom.
In Lightroom go to grid view and select
all of your images again.
Reselect “read metadata from files”
Go to the Slideshow tab and export your
slideshow into the video format of your choosing.
For
the video above I exported in 720p at 24 frames per second.
After a very long wait your video is
finished.
As with Hugin, there are several written and video tutorials out there to help you such as this one:
I hope you found this basic how-to interesting. If you are interested in photography and would like to learn more just let me know!
As Community Relations Coordinator for my current library system, part of my job's duties consist of being the chief photographer for the system as well as maintaining our social media presence. When our system was forced in August of 2012 to replace the carpet in one of our branches I had the idea to take before and after panoramic shots of the carpet and to make time-lapse videos of the whole "renovation" process. There are several ways in which you can apply panoramic and time-lapse photography in a library setting, from architectural photos to time-lapses of library use. Below I will briefly introduce you to what panoramic and time-lapse photography are, and in Pt. 2 I will provide a simple how-to for creating your own.
The finished presentation video from our 2012 carpet replacement (my tattooed leg makes a cameo while I was painting on a ladder):
While my library system does have a couple of "point and shoot" digital cameras, I prefer to use my own Canon DSLR (Digital Single-Lens Reflex) camera and lenses for different events (oddly there is a DSLR on the cover of our textbook but not really mentioned). One of the major advantages to using a DSLR vs. using a point & shoot, apart from the image quality, is that I can use a lens with a higher aperture and a higher ISO setting to allow for natural light shots.
Aperture in digital photography generally refers to the size of the hole in the lens that allows for light to travel through to the camera sensor (a lens with a 1.4 or 1.8 aperture would be able to shoot in darker environments than a lens with an aperture of 2.8 or 4 because of the holes being larger, but generally the higher the aperture the higher the cost of the lens).
In digital photography ISO generally refers to an exposure index, while in film photography ISO would refer to the film speed.The higher the ISO setting, the more darker the environment you are able to shoot in, albeit with the introduction of digital artifacts (or noise) into the image.
What this simply means is I am often able to get more candid event pictures without the distraction of using a flash
So what are panoramic photos and timelapse videos?
Panoramas
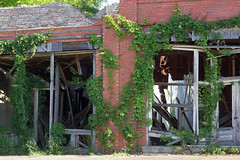
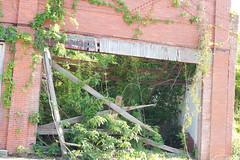
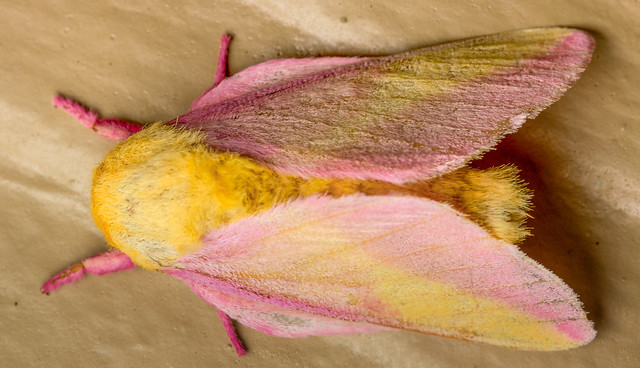
Panoramic photos are, for the most part, multiple photos taken sequentially with a tripod, and then stitched together using specialized software (such as Adobe Photoshop or Hugin) in order to present a wider field of view. While the majority of panoramic photos you will find on the Internet are of natural landscapes, you can utilize panoramic stitching in any setting.
As an example of just how versatile panoramic stitching is, this is a macro shot I took last year of a Rosy Maple Moth made by stitching together nine separate macro images shot at a 1:1 ratio:
In the context of a library you can construct 360 degree images of interior rooms, capture large events (note that movement might cause artifacts in the stitching process), construct Facebook cover photos, or take exterior building shots.
This is an example of one of the 360 degree interior images featured in the presentation above (to see it larger click here):
Time-Lapses
In general, time-lapse photography consists of several
photos taken in sequence incrementally (1s, 5s, 10s, etc.) over a set period of
time. In order to construct a time-lapse video you would convert the sequence
of photographs into a video file using specialized software such as Adobe Lightroom in addition to LRTimeLapse.
The standard video frame rate
is anywhere from 24 to 30 frames per second, so at 24 frames per second you
would have to take 1440 photographs in order to have 1 minute of video. This
would mean that if you were planning on capturing 1 minute of video over a 4
hour period you would need to shoot at 10 second increments.
Here is one of my first time-lapse videos of
an Orb Spider constructing a web:
Professional time-lapse videographers utilize several different techniques to construct their videos which might include automated dolly systems, computer control systems that can adjust camera settings over time, and external lighting to highlight subjects (especially for night shots).
Here is an example of a professionally shot Time Lapse:
For the purpose of shooting a time-lapse in a library setting, while an automated dolly would be nice, a simple set-up should be sufficient. Examples of potential uses for time-lapses in libraries could include footage of daily computer use, a library building project, shelf maintenance and shifting, creating murals, or daily/weekly library use in general.
A lot of my fellow classmates' blogs have fairly self-explanatory titles, so I thought I might should make a little posts explaining mine.
The first reason is fairly simple: it's my last name.
The name Spurlock roughly means Sparrow+Lake (although I have seen it listed in name origin books as meaning "a person dwelling beside a lake infested with sparrows"...really).
The second reason is somewhat multifaceted: For starters my wife and I are both first semester MLIS students and work in public libraries (separate systems), hence Sparrows being plural. The other being that looking towards the future I intend to keep this blog so that we can reflect on library life, etc.
Reflection is really what my whole third reason for naming this blog the way I did. I absolutely love the Song of Ice and Fire series of books and the Game of Thrones HBO adaptation. In the series, one of the main auxiliary characters, named Lord Varys, continually refers to his network of spies as being his "little birds." It isn't so much the idea of spying on library users that makes me think of patrons sometimes as "little birds," rather how we are given small glimpses into our patron's lives (often times humorous). So with humor in mind, I had initially planned on offering glimpses into some of my interactions with my "little sparrows" whenever I found an anecdote appropriate. Unfortunately I haven't really found a place for technology-related anecdotes yet, but I will leave you with one now:
Little Sparrow: "Your computers are broken."
Me: "What do you mean?"
Little Sparrow: "I trying to insert my card in and it won't give me my card back."
Me: "You put your card in the computer?"
Little Sparrow: "You told me to."
Me: "..."
Me: "Hold on."
At our library we use EnvisionWare's PC Reservation to manage our computer labs. We have a first-come first-served policy when it comes to computer use, but since different systems have different policies a lot of patrons come up to our service desk to be placed on a computer. When this happens we usually state, "You can get on any computer with a blue log in screen. Just type your card number and your last name in and you can get on." Apparently, this patron heard me say, "Insert your card and type your name." So what happened was that the patron stuck the card in wherever they could fit it: in this case, with our computers being 10 year old Pentium 4's the patron stuck their card into the floppy drive. One pair of tweezers later and they were properly put on the PC.
Lessons learned: Always make sure your patrons heard you correctly.
My Foundations course last week focused on the user privacy issues that libraries are currently faced with. One thing that stood out to me in our readings is an apparent double standard when it comes to how libraries treat patron book and account records vs. how libraries treat computer users.
According to Rubin (2010), the ALA has long affirmed the right to
privacy for library users (p. 390). From protecting a library user’s
personally information to what material a user circulates, the belief
that patron’s actions within the walls of a library are private and
confidential is a core ethical principle of the library profession. With
the belief that library patrons will not feel free to use library
materials or research controversial topics if a library user does not
feel free of governmental spying or the risk of public exposure, the
collection of personally identifying information should be limited to
what is necessary to complete the day-to-day operations of the library
(Rubin, 2010, p.391).
In Georgia PINES libraries, library
patrons are asked for proof of residency and contact information in
order to register for a library card. PINES policy however prohibits the
use of a Social Security card as a method of identification. The
information retained about a library patron is used solely to contact a
user in regards to ILL/PINES holds, contact a patron in regards to late
fees/overdue materials, or to contact a patron in regards to
collections. In this same regard, e-mail addresses may be added to an
account, and users may opt-in to e-mails from the library in regard to
library news. In PINES libraries, the only record of what a user
checks out is related to what a patron currently has checked out, any
outstanding fees for overdue materials and the materials that those fees
are attached to. It is possible to look at the last user that checked
out a specific item, however once fees are paid for that record is not
attached to an account and is only viewed in an items details. This is
so that if it is found that an item is damaged, the last user may be
tracked down for billing, but if a patron asks for a list of what they
have checked out in the past, this information is not accessible. In
addition, patron account information cannot be given out to law
enforcement without a court-ordered subpoena.
Noticeably lacking in the weekly readings were the use of Internet connected
computers by library patrons. In my library system we have measures in
place to protect user’s information on our public access computers. For
instance we use Faronics' Deep Freeze to hard-image our PCS in order to make sure that any data or open
login sessions that a patron might have on our PCs is erased as soon as
the computer is rebooted, yet at the same time our system’s computer use
policy specifically states that library users accessing computers are
under no obligation to privacy or confidentiality.
Our Network
Administrator states that this is so that the library can remain in
accordance with the Children’s Internet Protection Act (CIPA), which he
states we legally have to abide by in order to receive State funding, but what this translates to is that at any
time a library worker can go and monitor what a patron is doing on the
computer they are logged in to and that at any time our Network
Administrator may remotely access a computer through software like TeamViewer to monitor what they are
doing regardless of suspicion or activity (downloading music, accessing
pornography—a violation of our policy, installing software, filing
taxes, writing resumes, etc.).
This
would seem to me to be in a direct violation of the ALA’s standards and ethical codes in regards to privacy and confidentiality, and would seem
to go along with what Solove (2008) was conveying through the words of
Deborah Caldwell-Stone:
“Libraries
are under increasing pressure to discard this longstanding commitment
to readers' privacy rights. Law-enforcement agencies are exploiting
fears about terrorism and child safety to encourage lawmakers to strip
away statutory privacy protections for library records, eliminate
anonymity in the library, and encourage the philosophy that "good"
people should have nothing to hide. Federal laws use gag orders and
national security claims to prevent judicial review of potential privacy
abuses.” (p.58)
Different states and different libraries however approach computer privacy issues differently, some standing up for patron's right to the free access and flow to information, while other States further restrict user access:
How Texas and Arizona view things.
How Colorado views things.
In addition to Public Library employees in Georgia
being exploited to fears about of child safety in regards to CIPA,
public library workers as of July 1, 2012, are now required to be “mandatory reporters.” As
mandatory reporters, if any library employee suspects a child or teen of
being abused mentally, physically, or sexually…or even suspected of
being neglected, we are to report that patron to our local Department of Family and Child Services (DFCS) agency. Failure to do so and you are at the risk of fines
and/or jail-time. In my opinion being mandatory reporters is a clear violation of
maintaining a library user’s privacy and confidentiality.
When I first started working at my current library,
one of my first patron’s that I assisted was checking out several
materials that dealt with surviving domestic violence. In addition, the
patron had visible bruises on her body. At the time I made the comment
to a co-worker that “sometimes I wish we didn’t have to see what a
person checks out, because there is nothing we can do to help them.” I
ended up in a disciplinary hearing with our then Director, because the
co-worker somehow interpreted what I was saying to being pro-domestic
violence, however my then Director understood where I was coming from
and I didn’t get written up for it, but was given the advice that I
should never talk about what a patron checks out, regardless of my
personal feelings (even though I am doing it now), and this is spelled
out clearly in the ALA’s code of ethics. Yet, according to our status as
mandatory reporters, if this woman had been under the age of 18 I would
have legally been obligated to report her to DFCS!
Personally, I think the ALA, GLA, PLA, etc. need to
revise their standards to incorporate patron privacy when it comes to
computers; otherwise, if we sacrifice our principles to one aspect of
library use, we run the risk to sacrificing our principles entirely. Luckily it seems as though the ALA's office of Intellectual Freedom recognizes this double standard, and it seems as though as of 2012 it has become a top priority. Maybe in the next edition of Rubin's Foundations I will have less to be concerned about?
What do you the reader think? Is it a double standard to treat patron records as confidential while at the same time not treating their internet use the same? Further, when, if ever is it ever ethically ok to check a person's usb drive for content? Never? If you are trying to track down the owner of a lost drive? What happens if you look at a patron's drive contents and there is questionable content such as child pornography or pirated music, do you turn the owner in to the authorities, or do you maintain your ethical principles to respect the patrons privacy?
For my Chronology I focused on LIS technology from 1900 to Present. There was a lot that I felt was left out or expanded on.
The chronology was made with Timeline 3D in OS X 10.6.8, before being exported to Keynote to add the introduction and conclusion slides (to submit it for grading the extra step of exporting from Keynote to PowerPoint had to be taken), before being exported as a *.mov and uploaded to YouTube.
In my Digital Audio Formats presentation I had originally
intended to include a slide about podcasting but let it slip by (just as I had
originally intended to talk about FLAC and OGG formats but opted for WMA
instead). As Burke (2009) defines it, podcasting is the process of creating and
sharing audio content with interested recipients, either through downloading
MP3 files from the producer’s site or by receiving updated content through RSS
feeds (p. 265). As the name would suggest, podcasting was originally tied to
the iPod. Still to this day the main method of managing and syncing podcasts is
through Apple’s iTunes (which Burke refers to as RSS feeds).
Some of the most popular podcasts according to the iTunes
Store’s Top Ten chart come from National Public Radio (NPR), with This American
Life, Freakonomics Radio, and Radiolab taking up the top three slots
respectively.
The number three podcast, Radiolab, actually got me thinking
about my first blog post on Siri and the future of library reference again. In
the premiere episode of season ten entitled “Talking to Machines” (available
for streaming below) the entire hour is devoted to the blurring lines between interactions
with humans and robots (or
artificial intelligence).
In the first segment entitled “Clever Bots”
discusses how modern day programming has allowed for people to carry on
conversations over the Internet with what are thought to be people but are in
fact bits of code which are so convincing to some people that they might even
trick themselves into thinking they are in relationships with the programs.
Further still the program called ELIZA, developed by MIT in the 1960s, is
discussed. ELIZA was originally programmed to give answers that mimicked the
responses of a therapist (originally intended as a joke by its creator), but as
the creator discusses on Radiolab when students and the creators secretary were
exposed to ELIZA he found that they would end up talking with the program for
hours as if they were talking to a human.
When I think even further, basic reference questions can
already be answered by technology such as Siri and Google now. Whereas you
might have in the past asked a reference librarian for directions to a destination,
now you simply have to say, “Take me to insert destination.” To make
matters worse, if someone actually calls the reference desk (at least at my
library) and asks for directions, a phone number, movies show times, etc. the
first thing that we do is go to Google for the answers.
So thinking further about Siri and Google and their
technologies taking over library reference, it isn’t a matter of when ‘will’ it
happen, in some instances it already has.
Reference:
Burke, J. (2009). Neal-Schuman
library technology companion: a basic guide for library staff (3rd ed.).
New York: Neal-Schuman Publishers.
I've been a recording musician since the late 90s and was an early adopter to Mp3 technology. I started recording and editing audio on CoolEdit (now Adobe Audition) and since transitioning to Apple computers about five years ago now use Logic Studio, the open source Audacity, and Ableton Live to record and mix audio. I admit to sharing Mp3's and RealAudio "mix-tapes" through a private Ftp server that a friend ran in the mid 90s prior to the release of Napster (and later the more indie-music friendly Soulseek).
I only say this to say that I know my way around audio codecs, compression rates, etc.
But that's my "other life." For my day job I function as the Community Relations Coordinator for a large, mixed urban and rural public library system. When I am not performing my regular tasks I often have hours at our Reference Desk. Part of working in reference in any public library is leading continuing education classes such as "basic computing for seniors."
It was with continuing education in mind that I approached my PowerPoint presentation for MLIS-7500. I wanted to make sure that I demonstrated knowledge of the subject, but at the same time I wanted to make sure that I did not get bogged down into topics such as sample rates and why 96Hz audio using AAC compression has superior audio to an Mp3 at the same bit rate.