In Part 1 I discussed uses for panoramic and time-lapse photography in libraries. For Part 2 I will take you through the Basic steps of how to create your own.
To create a video like the one I produced for my library you will need:
- DSLR Camera
- While you can use a point and shoot to create time-lapses and panoramic photos, it often requires that you modify the firmware of your camera with third party software (especially with time lapse photography).
- Another added benefit is that DSLR cameras can shoot in the uncompressed RAW format which allows for easier editing if you had some of your initial settings wrong.
- A wide-angle lens
- Use a wide angle for panoramas especially. A standard lens (35mm and up) could be used, but would require more photos to be taken. For the videos and images above I used a Canon 20mm and a Tokina 11-16mm lens.
- For time-lapses use whatever lens fits your needs, however in the videos above I used a wide-angle lens.
- Tripod
- Preferably a tripod with a panning head and 360 degree markings.
- An Intervalometer or camera with modified firmware such as Magic Lantern with built-in intervalometer.
- An intervalometer is a device that you connect to your camera that can take a set number of photographs over a set period of time, as well as holding the camera's shutter open for a desired period of time (this is good for shooting night time photography).
- A Computer
- I use Macs for editing preferably.
- Adobe Lightroom
- For managing and editing the photographs and for exporting the final time-lapse video.
- LRTimeLapse
- This tool aids you in your Lightroom time-lapse workflow.
- Hugin
- Open Source panorama stitcher for OS X, Linux, and Windows.
- Presentation/Slideshow software with the ability to pan large images such as FotoMagico for Mac.
- Optional but helpful: Extra batteries and memory cards.
- Time and Patience.
Creating panoramic images is a really simple process. Modern Android and iPhone smartphones have the ability to create panoramic shots with their built in camera software. While you can take shots by hand, using a tripod helps to eliminate shake and allows for you to eliminate a lot of overlap (which can cause artifacts in your final image).
By using panoramic stitching software such as Hugin you will be able to take individual shots such as the ones directly below and turn them in to one final shot (to she the original images go here).
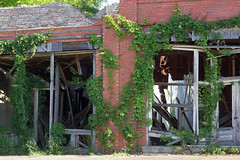

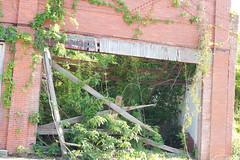
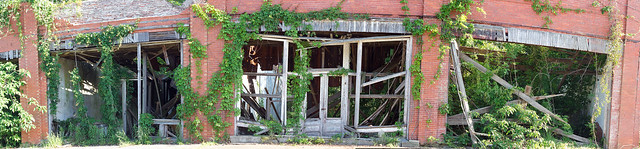
The above images stitched together in Hugin:
Steps
- Find something that you want to take a panoramic image of and mentally frame the shot.
- Set up your camera, frame the shot, adjust your settings, and take a test shot. Repeat as necessary.
- When you are ready to take your first real shot be sure to take it at the extreme edge of the final image you wish to create (you will either be panning your camera left to right or right to left).
- Take the shot.
- Pan your tripod head left or right (depending upon where you started from) in incremental degrees based upon your distance from your subject and the lens you are using.
- For the above shot I was using a 50mm lens at a distance of 30 feet from my subject, so I moved my tripod in 20 degree increments. If I was using a 20mm lens at the same distance I would have moved the tripod in smaller increments because more of the building would have been in view originally.
- Take your next shot and repeat step 4 as necessary until satisfied.
- For the image above I stitched together 5 images (you can stitch together as few as two images).
- Upload your images to your computer.
- Import your images into your photo managing software of choice (in my case Adobe Lightroom) and edit your first shot.
- It is important to make sure that each shot has the same White Balance and Exposure. You can either do this by taking your photos in manual or by taking your photos in the uncompressed RAW format (not a compressed jpg).
- Copy the settings of your first shot and paste them into your other images to make sure that they all have the same settings.
- If you shot in Raw export your images to jpg or tif once you are finished editing.
- Open Hugin and load your images.
- Select align.
- Once the alignment is finished you will have the option to change the alignment and orientation of the image as well as crop the image to your desired setting.
- Once finished with step 12 select "Create panorama," name the file, and select save.
- The last step is to open your finished tif file to check for errors, and if satisfied convert your image to whatever format you wish to use (jpg, gif, etc.).
Creating Time-Lapse Videos
For the most part you approach creating time-lapses the same
way that you approach creating panoramic images, but instead of stitching/blending
the images together you are presenting them sequentially in a video format. Depending
on the settings and the rate of images taken there are similarities to “stop
motion” videos.
Here is a time-lapse example I created last night using the
following steps:
Steps
- Locate something that you want to take a time-lapse of (library computer lab, reference desk, front entrance, etc.).
- Set up your camera and tripod and adjust your cameras settings. Set your focus, white balance, and exposure to manual to insure all settings match.
- Set your intervalometer to your desired settings.
- Set it to take a shot every x-amount of seconds/minutes/hours.
- Set the desired amount of shots to take (my intervalometer can take up to 9999 shots for instance)
- When you are ready to begin take a test shot to check your settings. If the shot meets your needs start your intervalometer.
- If your camera does not need to be attended and your shooting is going to be over several hours be sure to check back occasionally to monitor your battery and memory card.
- When you are finished import your images into your photo manager. The rest of the steps are Lightroom and LRTimeLapse specific.
- Open up LRTimeLapse
- Locate the image folder that you imported your images to.
- Select Initialize
- Once the previews have loaded (this can take quite a while) define the area of brightness in your first image (be sure to select something constant, in the video above I selected the blender in the background).
- Preview the time-lapse
- Select your keyframes and save.
- Open up Lightroom and select the images you previously imported
- Select grid view and select all of your images
- Select the Metadata menu option and click on “Read metadata from files.”
- Find the first image in your sequence with a star (this is your keyframe) and edit the image according to your taste. By default LRTimeLapse changes the white balance and crops the image. You can change the crop and white balance to your tastes.
- Copy the images settings and select your other images. Paste the first images settings into your other images.
- Save the metadata and switch back to LRTimeLapse
- In LRTimeLapse select reload.
- Click on Auto transition.
- If there is a lot of “flicker” in your preview video select “deflicker” and adjust the settings as necessary.
- Click on Save and return to Lightroom.
- In Lightroom go to grid view and select all of your images again.
- Reselect “read metadata from files”
- Go to the Slideshow tab and export your slideshow into the video format of your choosing.
- For the video above I exported in 720p at 24 frames per second.
- After a very long wait your video is finished.
*slow clap* Wow.
ReplyDeleteHello
ReplyDeleteThis is the first time I heard of creating time lapse videos. You provided some step by step directions. Thanks.